
Claude MCP: what it is and how to add a server
By PostPen Team ·
MCP (Model Context Protocol) is an open standard, created by Anthropic, that lets Claude connect to outside tools and data through MCP servers. In the Claude apps, you add a server as a custom connector: go to Customize > Connectors, click "+ Add", choose "Add custom connector" and paste the server's URL.
In Claude Code, run claude mcp add --transport http <name> <url>.
Start free if you want your agent to post for you. Your agent writes, PostPen schedules and publishes.
What MCP is in Claude
Claude's developer docs, Model Context Protocol (MCP) (Claude Docs, checked October 19, 2026), describe MCP as "an open standard created by Anthropic for AI applications to connect with tools and data sources." When someone adds an MCP server to Claude, they see it as a connector.
A server exposes three kinds of capability to Claude:
- Tools: actions Claude can perform, such as search, create and modify.
- Resources: data Claude can access, such as files, documents and records.
- Prompts: predefined interactions for specific tasks.
The same page says each user authenticates each connector on their own, their permissions mirror their access on the outside service, and they can disconnect at any time (checked October 19, 2026).
Local vs remote MCP servers in Claude
A local server runs on your device, and a remote server is hosted on the internet (Claude Docs, checked October 19, 2026). Get started with custom connectors using remote MCP (Claude Help Center, checked October 19, 2026) adds the detail that trips people up: Claude reaches a remote server from Anthropic's cloud, not from your computer. Local servers set up in Claude Desktop's claude_desktop_config.json file are a separate mechanism, and they aren't available in claude.ai.
| Remote MCP server | Local MCP server | |
|---|---|---|
| Where it runs | Hosted on the internet | On your device |
| How Claude reaches it | From Anthropic's cloud, so it must be reachable over the public internet | Configured in Claude Desktop's claude_desktop_config.json, using your local network |
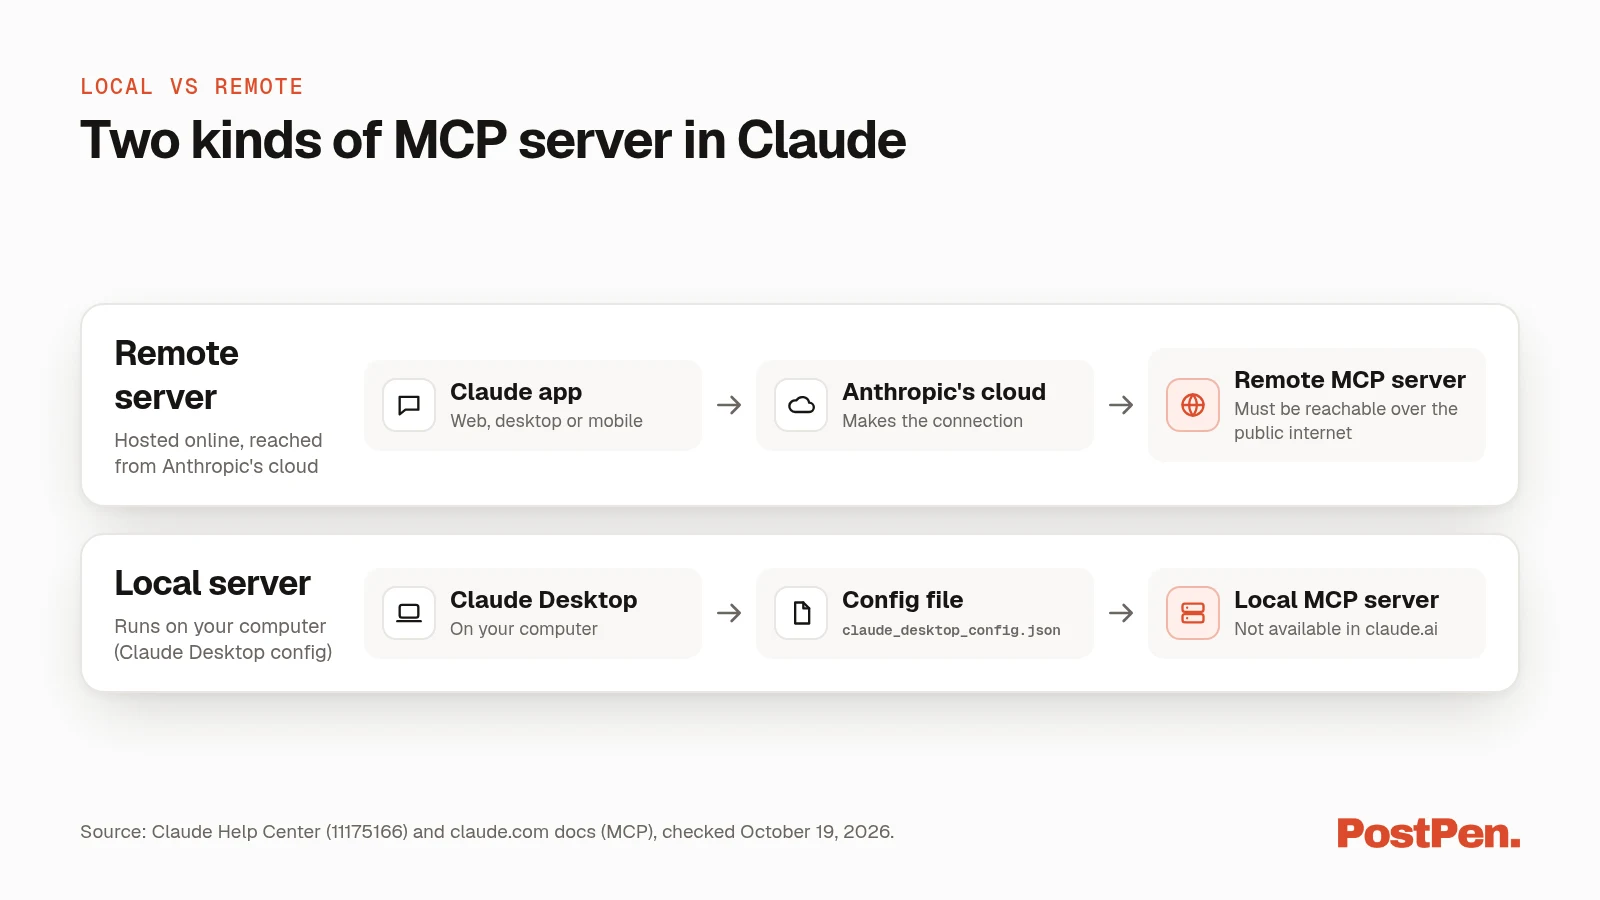
The Help Center says this applies across every Claude client, including claude.ai, Claude Desktop and the mobile apps. A server on a private corporate network, behind a VPN or blocked by a firewall won't connect, even if you can reach it yourself. To fix that, allowlist Anthropic's IP addresses in your firewall (11175166, checked October 19, 2026).
How to add an MCP server to Claude (custom connector)
Custom connectors using remote MCP are available on Free, Pro, Max, Team and Enterprise plans (11175166, checked October 19, 2026). The steps depend on your plan.
Pro and Max
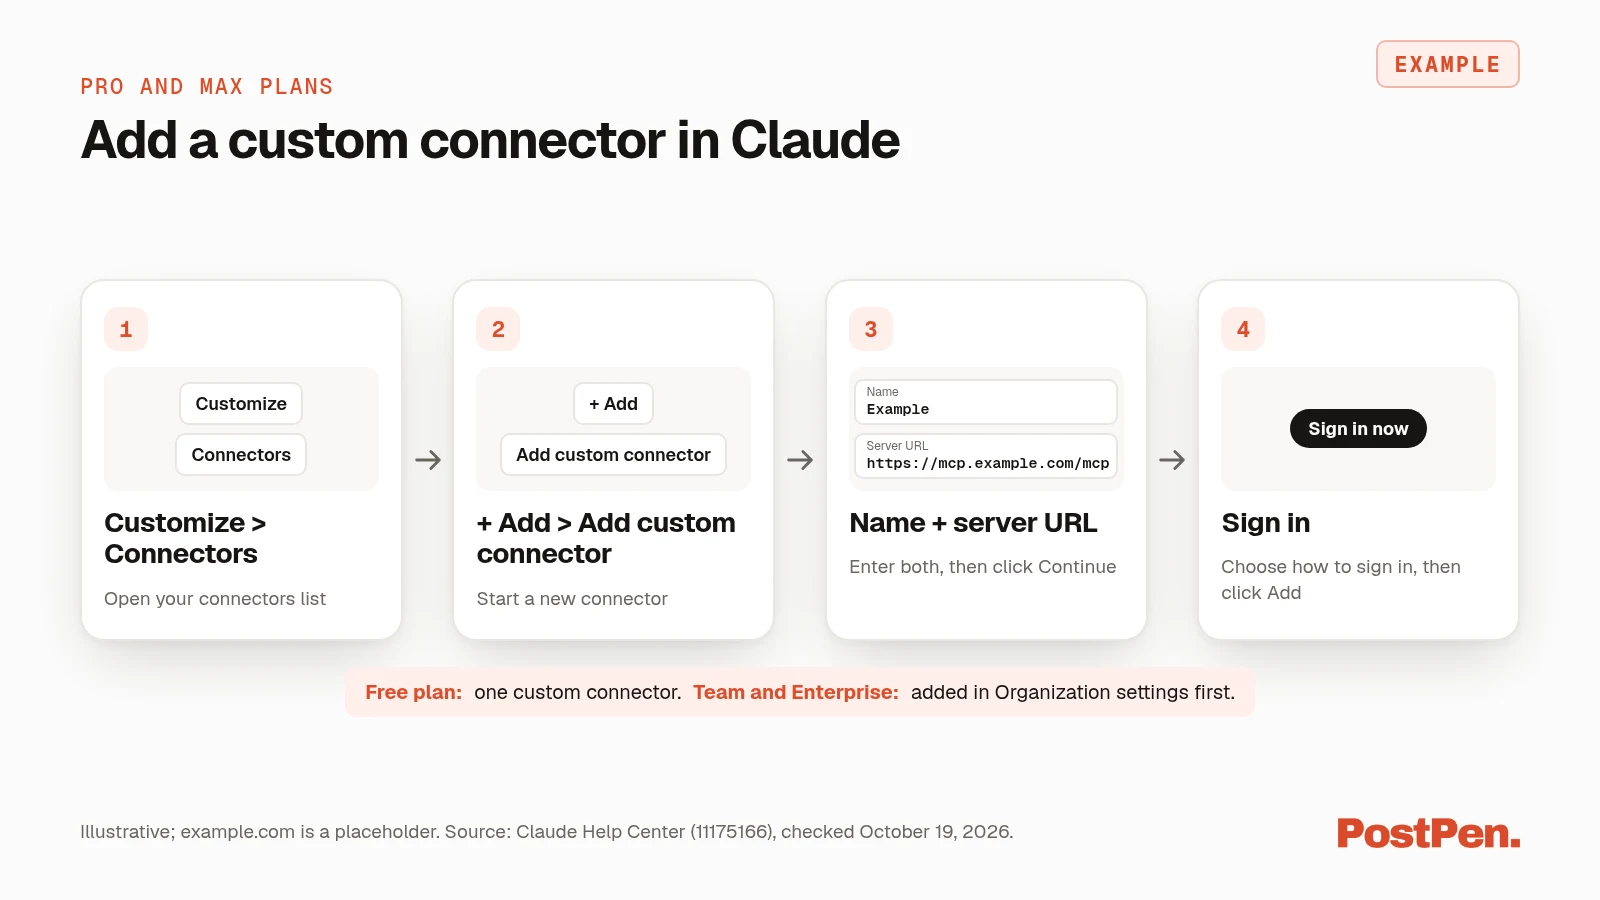
- Go to Customize > Connectors.
- Click "+ Add", then "Add custom connector".
- Enter a name for the connector. This is the name you see in the connectors list.
- Add the remote MCP server URL and click "Continue".
- Review the authentication settings Claude detected, change them if your server needs something different, and click "Continue".
- Under Authentication, choose "Sign in now", "Sign in when needed" or "No sign in".
- Under OAuth client, choose how Claude identifies itself to the server. Claude marks "Use Claude's published identity" as recommended. This option doesn't appear if you chose "No sign in".
- Under Request headers, add a fixed credential such as an API key only if your server uses one instead of OAuth.
- Click "Add".
Team and Enterprise
On Team plans, only Owners and Primary Owners can add custom connectors. On Enterprise plans, Owners, Primary Owners and people with a custom role that includes Manage access to Libraries can add them (11175166, checked October 19, 2026).
The owner goes to Organization settings > Connectors, clicks "Add", hovers over "Custom" and selects "Web". From there, the name, URL and authentication steps match the Pro and Max list.
Members then connect on their own:
- Go to Customize > Connectors.
- Find the connector your owner added. It usually has a "Custom" label.
- Click "Connect" to sign in and start using it.
Turn it on in a chat
Click the "+" button on the lower left of the chat, then "Connectors". Each configured connector has a toggle, so you can turn it on or off per conversation (11175166, checked October 19, 2026).
Note: Free plans are limited to one custom connector.
How to add an MCP server in Claude Code
Connect Claude Code to tools via MCP (Claude Code Docs, checked October 19, 2026) covers the command line. To add a remote server over HTTP:
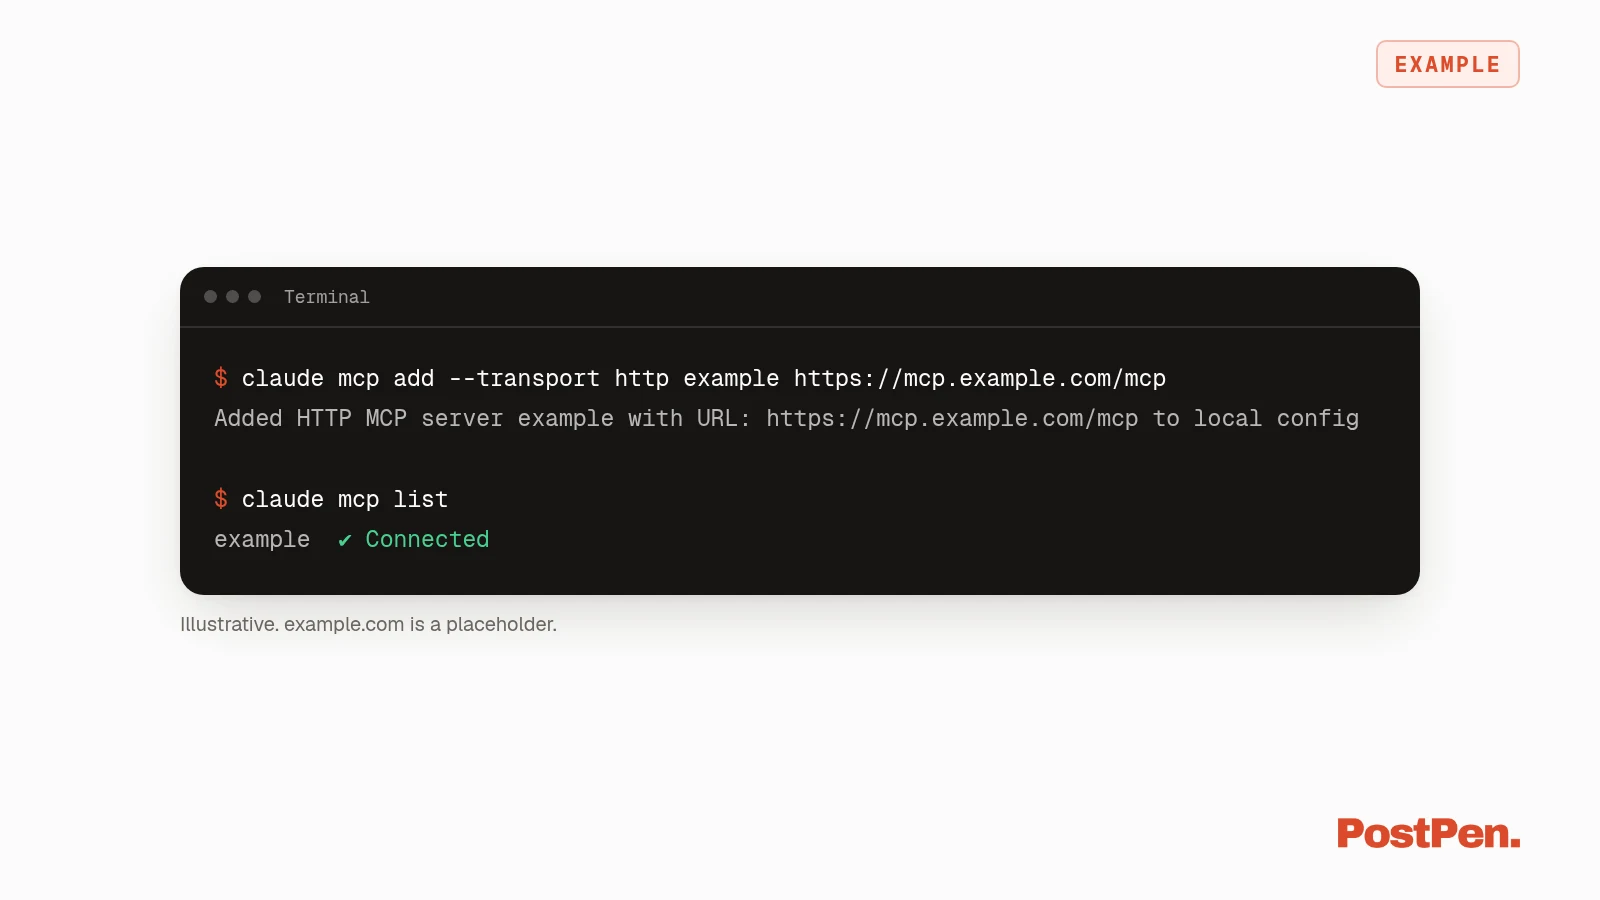
claude mcp add --transport http example https://mcp.example.com/mcp
A local server runs as a process on your machine. Everything after -- is the command that starts it:
claude mcp add --transport stdio example -- npx -y @example/mcp-server
Use --scope to choose where the configuration lives:
- local (default): only you, only in the current project.
- project: shared with everyone in the project through a
.mcp.jsonfile at the project root. - user: only you, across all your projects.
If the server needs a sign-in, run /mcp inside Claude Code and follow the steps in your browser. Run claude mcp list to see every server with its status, and claude mcp get example for one server's details.
If you sign in to Claude Code with a claude.ai account, connectors you added in claude.ai show up in Claude Code automatically. That only works when your active sign-in is a claude.ai subscription login (Claude Code Docs, checked October 19, 2026).
Edit or remove a connector
In the Claude apps, go to Customize > Connectors, find the connector, click "Remove" or the three dots next to it, and follow the prompts. Team and Enterprise owners can do this for the organization in Organization settings > Connectors (11175166, checked October 19, 2026).
The Help Center says that to edit a custom connector, you remove it first, then add it again with the updated details.
In Claude Code, run claude mcp remove example. For a remote server, Claude Code also deletes the sign-in tokens it stored for that server (Claude Code Docs, checked October 19, 2026).
Before you connect a server
The Help Center notes that custom connectors can reach services that Anthropic hasn't verified, and that once connected, Claude can access those services and take action in them (11175166, checked October 19, 2026). Its security guidance includes these checks:
- Connect only to trusted servers. Use servers built and hosted by organizations you trust.
- Review requested permissions. During sign-in, check what the server asks for, and deny access if it looks unnecessary.
- Watch for prompt injection. A malicious server can hide instructions that try to make Claude do things you didn't ask for.
- Use "Allow always" only for tools you trust. Click it only for a server and tool you trust to run unsupervised, and turn off tools a conversation doesn't need.
The Claude Code docs say the same: verify you trust each server before you connect it, because servers that fetch outside content can expose you to prompt injection (checked October 19, 2026).
Example: a posting server
For example, PostPen runs a remote MCP server at https://mcp.postpen.ai for scheduling and publishing LinkedIn posts. You add it like any custom connector, sign in in your browser and click Allow. Your agent writes, PostPen schedules and publishes.
See PostPen for Claude, or follow the setup guide for your agent. You can also browse PostPen's agent tools.
FAQ
MCP (Model Context Protocol) is an open standard, created by Anthropic, that lets Claude connect to outside tools and data. A server you add shows up in Claude as a connector.
On Pro or Max, go to Customize > Connectors, click "+ Add", choose "Add custom connector", enter a name and the server's URL, and follow the sign-in steps.
Yes. Claude's Free plan allows one custom connector.
Claude connects to remote servers from Anthropic's cloud, so the server must be reachable over the public internet. A server behind a VPN or firewall won't connect unless Anthropic's IP addresses are allowed.
Run claude mcp add --transport http followed by a name and the server's URL, then run /mcp to sign in if the server needs it.
Connect the tools you trust
Add one server, sign in, and turn it on in a chat. Keep the list short and the permissions tight.
Start free. Your agent writes, PostPen schedules and publishes.